When I first got my Korg Mono/Poly off eBay, quite a few of the keys didn't play. After some searching around, I tried some CaiKote on the rubber key contacts (as I described
here) and it worked great. When I bought a Korg Polysix off eBay, it had the same problem...and CaiKote saved the day again. But, now that it's been a few years, some of the keys on the Mono/Poly have stopped working again. Let's fix this problem for-real. Let's replace the key contacts!
 |
| New Key Contacts from LA Synth Co |
When I first had my problem with dead keys, I couldn't find anyone who sold new key contacts for these old synths. So, I had to use the CaiKote to restore the old ones. That was pretty cheap and pretty easy. I now know, however, that it's a fix that only lasts a few years. In that time,
LA Synth Co has started to sell brand new key contacts that fit a bunch of old synths from that era. Fantastic! So, $100 later, I've got a complete set to fit my Mono/Poly. Let's take the old girl apart and swap in these new parts!
 |
| First, remove the five screws on the bottom of the synth to release the keybed. Then, remove the screws holding on the metal panel so that you can get inside. Finally, unplug the keybed from the Mono/Poly circuitry |
Getting started is pretty easy. As shown above, I unscrewed the keybed and the main front panel. Then, I opened up the synth and disconnected the keybed from the circuitry. At that point, I was able to pull out the keybed.
 |
| The keybed has been removed from the Mono/Poly. |
With the keybed out of the synth, you can look at the side of the keybed and see how, when pressing a key, the key smashes down a gray rubber button (the "key contact") onto the circuit board underneath. It is through this contact that the brains of the synth know that the human has pressed a key.
 |
| You can see how pressing a key acts to press down the gray rubber key contact. |
On the underside of the keybed, you can see the brown circuit board. The key contacts are attached to this board. We need to remove this board to get access to the key contacts.
 |
| The underside of the keybed has a brown circuit board. Remove the screws to release the board. |
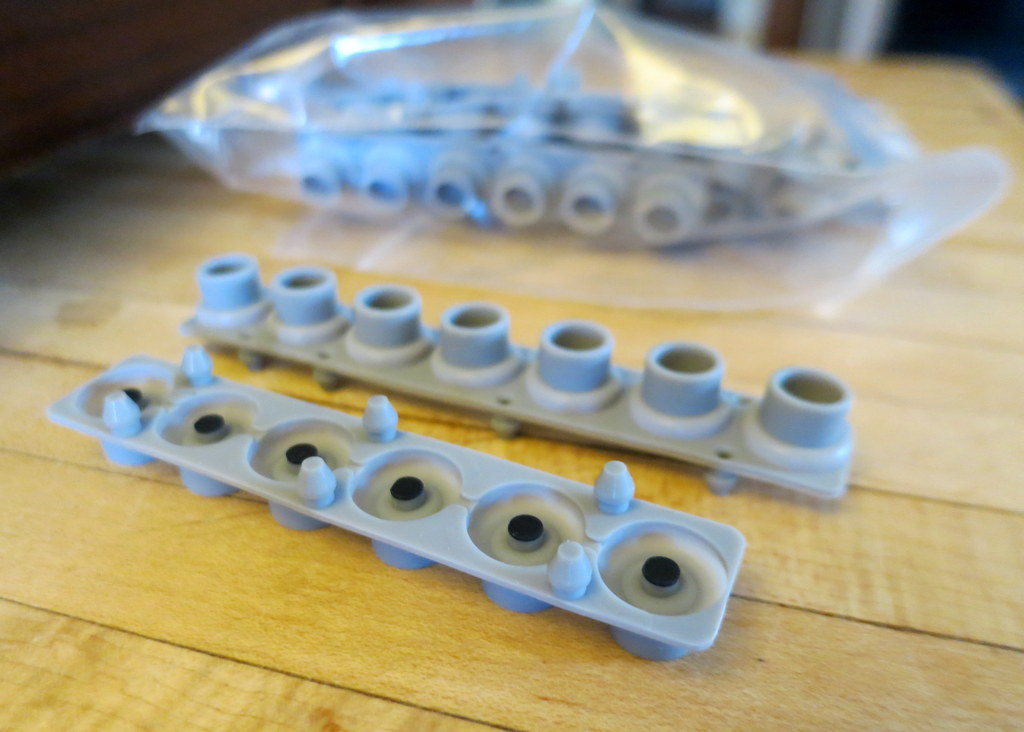
Removing the screws, the brown circuit board is easily removed. Flipping it over, you can see all of the gray rubber key contacts. They come off simply by tugging on them.
 |
| Removing the circuit board, the gray key contacts are revealed. |
 |
| Pulling on the gray rubber strips, the key contacts are easily removed. |
With the old key contact strips removed, now was a good opportunity to get out a little alcohol and clean the contacts on the circuit board. I probably should have used higher quality alcohol (only 70%?), or something better than a cotton rag for my scrubber, but this is what I had.
 |
| Time to clean the circuit board. |
With the board cleaned, I got out the new key contacts and lined them up to make sure that I had the correct assortment -- they're not all the same and I was worried that I might not have been sent the right ones. Luckily, LA Synth Co know what they are doing. I had what I needed. They lined up great and I attached them simply by pushing them on.
 |
| Getting ready to attach the new key contacts |
 |
| The new key contacts are attached simply by pushing them on. |
With the key contacts attached, I start putting the synth back together again. First, I have to re-attach the key contact circuit board to the bottom of the keybed. The only trick is getting the key contacts to fit inside their respective holes in the bottom of the keybed. It isn't hard, but you do have to pay attention.
 |
| These are the holes on the bottom of the keybed into which the key contacts must fit. |
After getting the board onto the keybed and screwed together, I did a visual inspection and saw that one key contact wasn't seated correctly (as shown below). So, I unscrewed the board and was more careful in putting them together. The second time, all the key contacts were seated nicely.
 |
| Here, after assembly, one of the key contacts didn't seat correctly. I simply took it apart and was more careful when I put it together again. |
That's it! The key contacts are done! The only thing left to do is to put the synth back together again. I have to put the keybed back in, screw it in, and screw the front panel back down.
 |
| Time to put everything back together again! |
 |
| Fully re-assembled, I also to this as an opportunity to clean the keys and the front surface. Looks great! |
The re-assembly went easily. I also used my rag and alcohol to clean the tops of the keys and the control panel. She looks great now!
Plugging her in, they keys all work. The joy! Not only is it a joy to play an instrument that works, it's a real satisfaction to have fixed it myself. Fixes don't really come any easier than this one. Thanks LA Synth Co!


Now that it's once again playable, any mod plans for this beast of a synth?
ReplyDeletehmmm interesting... i saw the youtube video by syntegrator on replacing the contacts and it seemed that HIS source (synthdoctorin') was providing less than functional contact points. I have a mono poly and a few polysixes to do - I bought some KaiCote 44 - but now I am wondering if that is the way to go. I did some initial trials with something called 'keypad fix' which i modified with gum arabic in a few trials (straight and mixed) - worked great at first but stopped working after a few days. I don't want to have to be taking these keybeds apart perpetually - and I'm actually wondering if it has to do with the rubber (silicone?) fatiguing and not conveying pressure to the contacts as well as it used to ...
ReplyDeletealso wanted to say THANK YOU (!!) for your stunningly informative site - i've read over many of the pages and it has me full of optimistic ideas for my synths... great to see someone else's trials - very encouraging. (bows to you, sir) - Jonathan
If you use the paints they're known to be iffy over time which is why I developed the contact disks WHICH (like anything else) if applied as per instructions have worked wonderfully for 100's of keyboards. I'm 'sounddoctorin' on youtube Jonathan. If you put kaicote or anything else paint wise on there you've got a mess if it doesn't work right. If you get a disks that doesn't work you just peel it off and put on another. They can get bent sometimes and not contact quite right but it's rare if you are handling them carefully on the install. Also you have to make sure there is enough contact . The panasonic movements are often ALL OVER THE PLACE in tolerance. Some contacts barely touch.
DeleteNow who is this syntegrator guy and why didn't he contact me?
Hi,
ReplyDeleteGreat to see how many different things one can still do with an old analog synth.
I want to go one step further still, and clone my own Mono-Poly. But I got no good photo of the KLM-354 VCO board without the second PCB and all the cables in the way.
I was wondering if you could maybe please post a few good pics of the KLM-354 without the 2nd PCB and with the cables at different positions? This way I could stitch me a good overall PCB layout pic together.
In return I would for sure share the clean redrawn schema and PCB with you.
Cheers,
t8lule
THANK YOU for the write up, and your in-depth Korg circuit analysis! :D
ReplyDeleteAfter analyzing the action of the key contacts for a while, it came to my attention that besides the years of contacts being destroyed people being misinformed to use alcohol on their rubber contacts (NO NO NO NO! BAD!), the domes and contacts would slightly deform on their own. This combined with crud build up or the carbon becoming too thin, left a lot of non-functioning keys. When you install our new contacts, you will notice the keys are faster and more "strident" feeling. Its quite amazing how much of a difference you feel with these taller (correct height) domes.
To be honest, I remade these contacts to speed up the process and give reliable results, plain and simple. The paint is a major pain and if you get it wrong, you have to take it all apart and do it again, wait for it to dry, etc. then try again. This gave me a hard time in the shop as it would add dry time, leaving me with synths splayed open in my very busy shop taking up room. In addition, sometimes they'd come right back a few weeks later. That's not how I do business, I like to make sure we fix things right the first time.
I'm glad you like them and they worked out. Making these up was neither cheap nor easy, and its great to see the work in use!
I also want to add that the Sounddoctorin' adhesive dots work great as well, and are super versatile. There are many switches (IE rubber domes in Juno-60 switches) and contacts that cannot be replaced, but can be repaired with them. They're an excellent multi-use tool for any tech and great for situations where there are no other parts available . Just like anything you must follow the instructions and apply them correctly. I've had 0 failures with them. Every tech should have some.
Just wanted to say thanks for taking the time to put up this information. i had tried all the different options for getting my MP keys to fire. some worked better than others but none of them ever got the keys to %100.
ReplyDeleteLA SynthCo has saved the day with these contact strip remakes. I just finished installing them and all keys are firing and feel great! just when i was beginning to lose hope you guys saved the day!
Thanks for your great blog - but i just wanted to add that I've found an even simpler route to restoring keyboard response. Having looked at the 'gold' contacts through a proper stereomicroscope - i discovered that, for whatever reason - there is a shellac like deposit left on the gold pads that seems to be responsible for the loss of contact. It's NOT THE PADS! i found that by carefully scraping away the shellac deposit (neither alcohol nor acetone will do it) with a tiny piece of 000 steel wood on the end of a pair of tweezers - i was able to restore full action in two of my polysixes AND my mono-poly. it's been about three months and no problems or issues yet. Sorry LA Synth Co. - maybe you'll get my business later.
ReplyDeleteGood to hear you found a fix for your synth, "Unknown"! Absolutely, In some cases (like yours), simply cleaning the environmental tarnish from the gold contacts is sufficient. We have found in our years of experience with these matsushita-type keybeds that often this isn't enough. BUT! One must be careful cleaning those gold contacts too!
DeleteMore often than not, the rubber contacts have been destroyed by years of use or neglect, alcohol cleanings (NO!),sweat or other liquids seeping in. In addition,they usually have deformed and lost proper height as well. This is why we made the effort to reproduce these parts.
When cleaning the gold contacts, you must watch that you do not take the very thin deposit of gold off the PCB or you will leave the contacts in a state where they can easily tarnish and increase the resistivity higher than the synth can sense. Even fine steel wool can even be too aggressive for this gold layer. how often this happens depends on usage and local environment. Re-coating the gold is far trickier than replacing the carbon contacts. We like to use alcohol and a soft cheesecloth or a drafting eraser to clean the gold.
Perhaps we will hear from you if your contacts ever wear out. Maybe not! :) Thanks!
it's really fairly obvious from using a stereomicroscope what is going on - there is an atmospheric 'lacquering' going on - i guarantee you - this is the case with all such keyboards - I have a few polysixes and a mono/poly - all from totally different sources - all had the exact same laquering going on. The steel wool ( provided it's fine enough) does a great job... though other abrasives could be used. I haven't found a solvent yet that can do it chemically though. But yeah as long as you use decent magnification and care you can clean those contact problems right up.
DeleteTo the guy claiming that it's not the rubber contact strips, and that they just need to be cleaned, he is dead wrong. I tried cleaning my OB-8 contacts multiple times over the years. It did not help much, and eventually, I lost over two octaves of notes. Last week I ordered these replacement Key contact strips from LA Synth Co. When they arrived, I replaced them exactly as described in your tutorial, and voilla! My OB-8 works 100%! Every note, and the action is as good as the day it came from the factory! Thank you :)
DeleteThank you a lot for sharing your knowledge! It made me find the courage to open up my old Korg MonoPoly synth and fix by myself the 16 keys that didn't worked anymore. I just cleaned the contacts with the pencil eraser and a special "contact cleaner" from WD-40. I didn't even had to replace any rubber part or to use some caikote.
ReplyDeleteI would advise to use an "air duster" or "dust off", it's realy helpfull to clean the inside of any old synth.
Result:A lot of money saved, the proudness to fix something myself and a lot of music incoming.
Thanks again, great job!
Thanks for this great tutorial, one question, will this work to improve the keybed feeling of Korg Pa700 ?
ReplyDeleteBest
I have the Sounddoctorin adhesive dots. I used them on 3 Polysixes I was referbishing. I sold two, but the one I kept has had virtually no issues with key contacts since I put them on, back in 2010/2011! But it's good to know that replacement domes are available. One of my strips has a missing dome :(
ReplyDeleteThank you so much for this!! I have an old MonoPoly that I've had since I was 15 years old!! Been in a box unused for over a decade - I had sold off my other gear but held on to this one. I recently got a modern weighted-key piano-action unit and started playing again (really nice), but wanted to revive this because - it's an awesome mono synth! But, nearly 1/2 of the keys do not trigger anymore. This is very likely what the doctor ordered (and now I will order!).
ReplyDeletejust try carbon hb2 pencil en clean the gold contacts witch isopropylalcohol
ReplyDelete