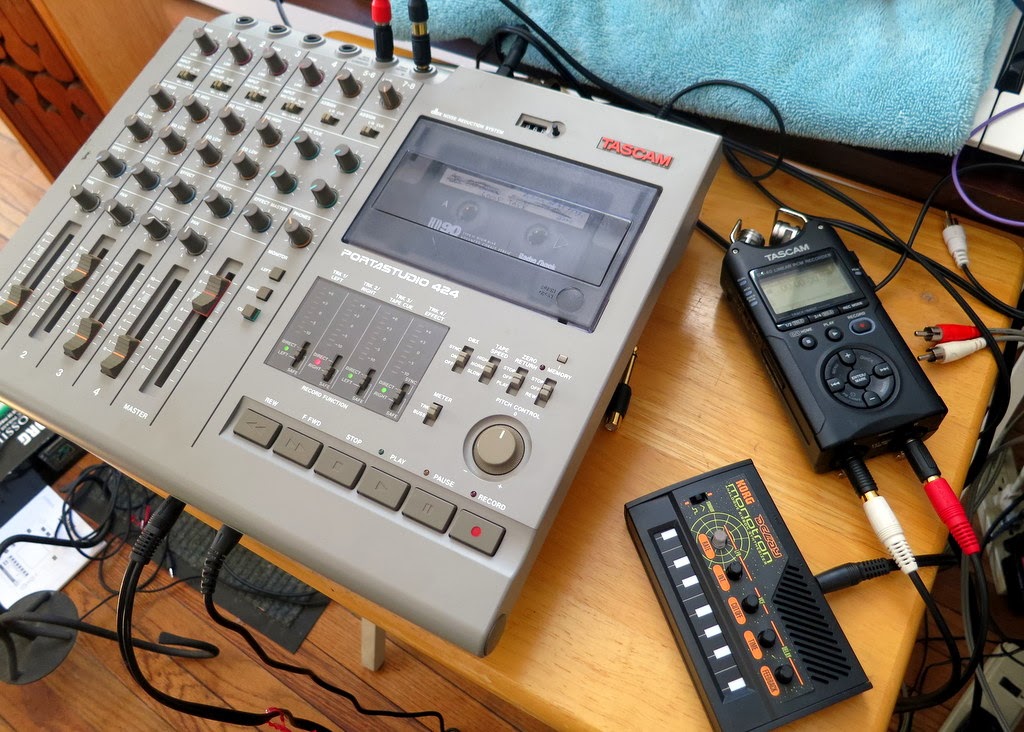
The Portastudio 4-Track Cassette Recorder: Below is a photo of the outside and of the inside of my Portastudio cassette recorder. Since I have no schematic for my Portastudio (does anyone have one that they can send to me?), I'm forced to figure things out by physical examination. So, like a doctor poking and prodding, let's begin...
 |
| My Tascam Portastudio 424, Outside and Inside |
Erase Head vs Record Head: Since I assumed that my problem with the gap in my recorded loops was due to the erase head, I began my examination with finding the erase head. As you can see in the picture below, it is nicely labeled. You can also see that it is indeed physically separated from the play/record head (by about an inch). When recording (or playing), the tape passes over the erase head to be cleared prior to passing over the record head to receive the new audio. As a result, there is always a one-inch section of the tape that will contain no audio at all. This is the gap that I have been hearing in my loops.
 |
| The Erase and Play/Record Heads on the Portastudio |
 |
| Seeing Where the Erase and Play/Rec Heads are Wired Back to the Main Circuit Board. |
Unplug the Connector: The easiest way to defeat the erase head is, perhaps, simply to unplug it. So, that's what I tried.
 |
| To Disable the Erase Head, Just Unplug the Big Connector |
What are the "Erase" Signals: Because I was interested, I hooked up my oscilloscope to the pins on the connector that I just unplugged. I wanted to see what signals where being sent to the erase head. The pictures below show what I found. The connector has 8 pins, and each pair seem to give similar signals (I'd assume that each pair represents a single channel on the 4-track tape). For each pair of pins, one pin showed an 87 kHz signal with an amplitude of ~134 mV RMS. The other pin showed no signal, so it might be ground. I'm assuming that the 87 kHz is the bias signal used by cassette systems as the carrier for real audio signal that is amplitude modulated on that carrier. Since this is the erase head, there should be no audio, so it should just be the 87 kHz signal. This appears to be what I see.
 |
| Looking at the Signals on the Connector to the Erase Head. Looks like the 87 kHz AC bias signal (Left) and Ground (Right). |
Trying it Out: So, with the erase head disconnected from the main PCB, I tried recording some audio. As a sound source, I used my Korg Monotron with its funny little ribbon controller. As you heard in the demo tracks tat the top, when I defeat the erase head (by disconnecting it from the main PCB), I successfully eliminate the gap from my looped audio. Fantastic.
 |
| Using the Monotron Delay to Create Tracks on the Portastudio |
Visualizing the Results: In addition to listening to the demos, you can see the tracks visually in the spectrograms below. All of the tracks show recordings from the loop tape of the Monotron. The top figure shows a single loop of audio excerpted from a recording when the erase head was connected and active. Note the half-second gap at the end of the loop, which corresponds to that one-inch piece of tape between the erase head and the record head. The middle plot shows the result after I unplug the erase head. Note that the gaps is gone...the loop is continuous. This is what I hoping for.
 |
| Spectrograms of the Same Three Audio Demos From the Soundcloud Player at the Top of this Post. |
Layering Audio in One Track: Another important effect of defeating the erase head is that nothing clears the track between recordings. So, when you go to record audio onto a track, it becomes layered on top of the audio that was already there. An example of this sound-on-sound recording is given in the third audio demo (and in the third spectrogram above). Here, I first recorded the basic warbling tone from the Monotron as already seen in my other examples. This is "Layer A". Then, onto the same track, I recorded the Monotron with wilder variations in pitch. This is "Layer B". As is clear in the audio demo and in the spectrogram, both layers are clearly there. Note that this is not a mixture that has been done electronically (ie, read the previous track, mix it with the in-coming new audio, then record the mixed audio onto a fresh track). No, this mixture is being done on the tape itself. As far as I know this is very uncommon.
Imperfect Layering: I believe that one reason why it is uncommon to mix audio onto tape this way is because the layering is far from perfect sounding. Note that as "Layer B" dives from high-pitch to low-pitch (see the blue arrow), it seems to suppress a lot of the "Layer A" sound. It's not until the pitch of "Layer B" raises a bit that the tone from "Layer A" sounds strong again. To most people, this interaction between the two layers of audio would be an undesirable trait. But, not for me...I'm purposely looking for unusual side-effects of using tape. So, to me, this kind of weird artifact is gold!
Have any of you hacked your cassette recorders? What have you done?
Hi - great mod you have done here. I want to do the same with my UHER 4000 reel to reel. Only, instead of totally disabling the erase head I would like to add a switch, or better yet, a potentiometer. Only thing is I am not sure whereabouts on the wire to add the switch. Any ideas?
ReplyDeleteOther than my Portastudio, I know very little about how tape decks or reel-to-reel machines work. It is certainly possible that the erase function is implemented similarly on your UHER 4000 as on my Portastudio, but I don't know.
DeleteIf I were to put switches (or pots) on my Portastudio, I've already found the connector that goes from the main PCB out to the erase head. That's the connector that I show connected and disconnected in my photos. I could imagine cutting into the cabling that goes between the erase head and main PCB and inserting a four switches to selecting "cut" the wires for a given track.
You'll notice in my picture of the connector that there are 8 pins...2 for each track. So, if I were introducing switches, I use a double-pole switch so that it "cuts" both wires for a given track. Maybe something like:
http://www.digikey.com/product-detail/en/200MDP3T1B1M1QEH/EG2458-ND/378927
Synth Hacker: Portastudio - Defeating The Erase Head >>>>> Download Now
Delete>>>>> Download Full
Synth Hacker: Portastudio - Defeating The Erase Head >>>>> Download LINK
>>>>> Download Now
Synth Hacker: Portastudio - Defeating The Erase Head >>>>> Download Full
>>>>> Download LINK iA
Cool thanks - well on my machine there is only one big fat red wire that goes from the erase head to the circuit board. I'm just worries i'll mess it up and it wont work. I met someone who had already done this mod so it is possible somehow.
ReplyDeleteI also found that on the erase head there is four notches of where to solder stuff to - 2 notches are where the wire goes to the board..then there are 2 others - maybe I could solder a switch in there first to see if it does anything.
i picked up a tascam portastudio 424 to do the same thing as you but its a little broken...i have the same old MKI as you have in these pictures and I wonder if you know anything about fixing these joints?
ReplyDeletemy problem is that the tape transport doesnt work. when you hit play, it jerks up and then right back down without playing the tape. what's weird is that the fast forward/rewind functions work ok.
i've replaced the drive belt and verified that the capstan is spinning freely - i think that motor is OK. at this point i think its either the motor for the reels or simply a sensor or button that is not aligned right. you seem to be the only person with an original 424 cracked open on the internet so I figured it was worth asking here.
There's like six motors and actuators in tape transport complex. It's a pretty nice little piece of engineering. I am absolutely a newb when it comes to working with these things, but your theory that it's a malfunctioning sensor sounds pretty good.
DeleteJust to confirm, the capstan should be spinning all the time...played, stopped, doesn't matter. If the unit is on, the capstan should be spinning. Is yours?
Assuming it is, take the tape out and try hitting the play button. As you know, it definitely won't work with no tape in there, but does it "not work" the same way? Or, does it sound/respond differently. If different, then it's probably not the button that detects if the tape is present.
Can you take a video of your Portastudio not working and put it on Youtube? I'd love to see the symptoms...
hey, with a tape inserted or with the button depressed with my finger it does the same thing. with nothing in the deck/pressing the button it does nothing at all.
Deletethe capstan does spin all the time - when i turn the machine on at first it seems to be winding harder for a second or two and it slows to a constant rate. i'm not able to stop it with my fingers, so i think its pretty strong.
as far as motors there seem to be two - the capstan motor and a motor for the reels. there are a number of gears and a few belts to make things move together, but i dont see other sources of movement than those two motors.
heres a video: https://www.youtube.com/watch?v=_3TGy8j7tjo&feature=youtu.be
i filmed it in portrait mode because i am very smrt. you can see me poke the little button for "tape in" and then off camera press the play button a few times (this is the transport moving up)
Hi, maybe you've figured this out by now, but I wanted to say it's most likely your capstan motor. I have a 488 with the exact same symptom. The replacement motor is in the mail, so I can confirm this fix in a few days.
DeleteHi, great article ! Thanks to your research I was able to reproduce the same result on my Tascam Portastudio 414 (regular one, not MkII). The thing is, I am also a COMPLETE noob when it comes to circuitry and things like that. I was able to unplug the 8-wire connector, but I don't really like the idea of having it moving around freely in the case, touching something it shouldn't and frying the unit. I was wondering how did you solve this ? Did you tape the connector somewhere safe on the board ? I was thinking of adding a switch between the male and female plugs, so I could switch the erase head on and off, and not having to open the case each time I need to. What do you think of that ?
ReplyDeleteAnyway, thanks a lot for this article !
Cheers,
Jyb / Zalhietzli
hey man, I'm wondering the same thing.... just wanted to ask if you ever figured out how to do this?
DeleteFor my messing around, I think that I just put a little electrical tape on it and left it dangling. I would indeed have to open the case every time that I wanted to change it from plugged-in to un-plugged.
DeleteOf course, since I do a lot of hacking of my musical electronics, I almost never have their covers screwed on. Without the screws in, they're always ready for some modification!
Sorry I'm not more help.
Chip
Hey, nice work. I love seeing these things opened up and prodded. I just bought a 424 at a Salvation Army last week. It was filthy on the outside, but the heads and inside were pristine. After a thorough cleaning it's working perfectly! I'm have no need to mod it as I am using it to archive projects from the early '90s. I'm dumping two of the tracks to a DR-40, which I see above you are using as well. It's such a perfect set-up.
ReplyDeleteDid anyone ever send you schematics? I'm afraid they don't exist, but who knows.
hi! great research work! i got a Yamaha MT120S and the erase head wiring looks pretty similar. i was wondering if you managed to add a switch to it and which type of switch you used. thanks in advance!
ReplyDeleteHi, thanks for this article. I have a Tascam 414, and I'm wondering if I can do live looping with it if I defeat the erase head just as you have done.
ReplyDeleteBasically I'm wondering if I can continue loops and stack them on top of one another without having to switch to playback. Does disconnecting the erase head fix this at all?
good ideas, i have been wondering about how to achieve multi layering (was considering sticking tape ontop of eachother) and this is it. Im using a murphy 2022 and ive discovered that you can cover the erasehead with electrical tape or layers of a thinner sellatape and you get much the same effect!
ReplyDeleteHi, do you have any photos of the capstan flywheel motor assembly for a Tascam 424 MK1? I have one in for repair which I believe is missing the motor mounting brackets. Any help would be appreciated. Mike
ReplyDeleteMany thanks for those explanations. i prefer this tip than Sellotape directly on the erase head.
ReplyDeleteHi
ReplyDeleteThanks 4 the hack! Do you know a tape recorder with which I can record and get the audio out directly through the line out as it was on the reel 2 reel decks?
I think you can simply ground the bias signal that goes to the erase head at the connector. That way you only need 4 wires comming out of 4 switches connected to a common ground. Thats what I will try to do.
ReplyDeleteeven easier than this, is simply covering the erase head with foil paper, simple and easy and works just fine, and even protects the head.
ReplyDeleteHey there! You inspired me to break into my Tascam MF-P01 and the connector is identical. My daughter and I (it's actually hers) will probably work on this over the weekend. I just wanted to let you know that I had a box of dupont wires hanging around, and they fit the socket and connector perfectly, so I'll be able to make this a fully reversible mod by just inserting a switch in the middle of the new wires. Much easier to work on!
ReplyDeleteThis comment has been removed by a blog administrator.
ReplyDeleteThis comment has been removed by a blog administrator.
ReplyDeleteSynth Hacker: Portastudio - Defeating The Erase Head >>>>> Download Now
ReplyDelete>>>>> Download Full
Synth Hacker: Portastudio - Defeating The Erase Head >>>>> Download LINK
>>>>> Download Now
Synth Hacker: Portastudio - Defeating The Erase Head >>>>> Download Full
>>>>> Download LINK