 |
| Showing my Teensy 3.1 in the foreground. It is indeed small. In the back right is my digipot on its Adafruit SMT-to-DIP adapter board. An Arduino Uno is in the back left, but it is just being used as a power supply to provide 5V. |
What is a Teensy? Teensy is family of microcontroller boards, like the Arduino is a family of microcontroller boards. Teensy is aimed at folks who like the Arduino approach but who need something more capable. In my case, I'm using a Teensy 3.1, which has a 32-bit processor that can run up to 96 MHz. This is a lot more capability than the 8-bit, 16 MHz processor in the Arduino Uno. Raw speed, however, isn't my only concern. The Teensy is appealing to me because you can program it through the Arduino IDE and not have to learn some new way of programming microcontrollers. Re-using what I know, yet getting more capability. Sounds like a win-win situation.
Wiring the Digipot for 3.3V Operation: One somewhat-important difference between an Arduino Uno and a Teensy is that the Teensy operates at 3.3V instead of the Uno's 5V. This means that the whatever is connected to the Teensy (like my digipot) must be able to respond to the lower voltages. Lucikly, my digipot is compatible with either 3.3V or 5V logic, so everything should work fine. The biggest difference is that the output of the digipot (because of the now-smaller 3.3V input signal) will be limited to 0-3.3V, instead of the 0-5V signals seen with the Uno. For this test, the smaller voltage output is not a problem. This test is about speed.
 |
| Signals to use for testing the digipot with a Teensy 3.1, which uses 3.3V logic. |
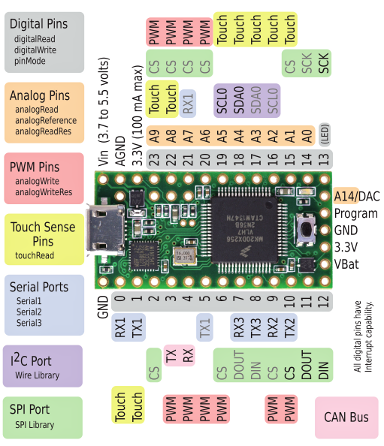
Wiring to the Teensy: From the picture above, I'll drive the digipot by providing it power at 3.3V and by sending it commands over via the Teensy's SPI pins. Looking at the pin map for the Teensy 3.1, I easily see the location of 3.3V and gnd. Looking for the SPI pins, I see "CS", "SDOUT" and "SCK" on pins 10, 11, and 13, just like on the Arduino Uno! Maybe that's by design, or maybe it was by coincidence. Either way, it's comforting to see things being so similar. So, overall all, as seen below, the wiring is basically the same as it was for the Uno. Great.
 |
| Wiring a Teensy 3.1 to the my digipot via a solderless breadboard. I connected power (3.3V), ground, and the three lines for the SPI bus. |
Teensy Add-On for the Arduino IDE: With the hardware elements all arranged, it's time to program the Teensy. Since I want to do this via the Arduino IDE, I needed to first download the "Teensyduino" add-on from the maker of Teensy. It's pretty painless. During installation, the installer provides you the option to pre-install a bunch of libraries that Teensy supports. I chose to install them all, but for this test, you probably just need to install the SPI library. Either way, it's easy. Once the Teensyduino software completed its installation, I started the Arduino IDE like normal. Once it was open, I went under the "Tools" menu (as shown below) and told the Arduino IDE to target the Teensy 3.1 instead of the Arduino Uno. Done.
Programming the Teensy: With the Teensyduino add-on, my hope was that I could rely on all my Arduino knowledge and not have to learn a new command set just for the Teensy. Relying on this hope, I simply opened up my existing digipot test program (written for the Arduino Uno) and told the IDE to recompile (Verify" in the language of Arduino). It was successful! It recompiled without any changes needed for the Teensy. Fantastic! Now, to actually transfer the program down to the Teensy hardware, one has to hit the pushbutton that's on the Teensy board. When I did that, the program zipped down to the Teensy and I was good to go. Very smooth. Very nice.
 |
| I'm switching the Arduino IDE to target my Teensy 3.1 instead of my Arduino Uno. |
Programming the Teensy: With the Teensyduino add-on, my hope was that I could rely on all my Arduino knowledge and not have to learn a new command set just for the Teensy. Relying on this hope, I simply opened up my existing digipot test program (written for the Arduino Uno) and told the IDE to recompile (Verify" in the language of Arduino). It was successful! It recompiled without any changes needed for the Teensy. Fantastic! Now, to actually transfer the program down to the Teensy hardware, one has to hit the pushbutton that's on the Teensy board. When I did that, the program zipped down to the Teensy and I was good to go. Very smooth. Very nice.
Driving the Digipot with my Teensy: With the Teensy programmed and ready-to-go, I hooked up all the wires between my breadboarded digipot and the Teensy according to the figure that I showed earlier. I then plugged the Teensy into its USB cable (to provide power) and connected my oscilloscope to the output of the digipot. I saw step-wise changing output voltages, just like I expected. It worked!
 |
| My test setup. Teensy on the bottom left. Digipot on a solderless breadboard on the bttom right. My oscilloscope shows a very quickly changing output signal from the digipot. It works! |
Is it Faster? How fast could the Teensy change the pot's value? Very fast. Very very fast. As shown in the screenshoot below, it was able to change the value six times in 8.1 microseconds (usec). That's a mere 1.35 usec per change. That's an update rate of 741 kHz! By comparison the Uno required 16 usec, which was an update rate of 62.5 kHz. So, the Teensy was about 12 times faster for this task. That's fantastic. Interestingly, the ratio of the their clock speeds (Teensy = 96 MHz, Uno = 16 MHz) is only 6x, so by actually showing a 12x increase in speed, it appears that the Teensy is much more efficient per clock cycle at this task than the Arduino. Very cool.
[Note: Based on questions I've received...yes, I did disable the println() and delay() commands when testing at full speed. I love that you folks are reading in this kind of detail! :) ]
 |
| Screenshot of the output of the digipot when being driven at full speed by the Teensy. Note that it completes a six step cycle in 8.1 usec, which means that each step is only 1.35 usec, which means that the Teensy can drive the digipot with an update rate of 741 kHz. Fast! |
Extra Capacity for Other Tasks: If I use this Teensy+Digipot setup in my nefarious plans for my Korg Polysix, I do not need it to update this fast. At worst, I'll need it to update every 20 usec, which means that the Teensy can do its update at its native 1.35 usec speed and then wait around for the other 18.65 usec and do other tasks. In other words, it'll only be busy (1.35/20) = 7% of the time. The other 93% of the time, it'll be free to do things like servicing in-coming Serial messages. I like having that much margin. It gives me confidence that the Teensy can perform all of its tasks dependably. My conclusion is that I've found my winning hardware combination for my Polysix modifications.
Hi
ReplyDeleteVery fast but since you haven't changed the code I guess you haven't used the fast ski library written by Paul Stoffregen :https://github.com/xxxajk/spi4teensy3
That should give some improvement ;-)
Regards
David
When I installed the Teensy drivers, I accepted all of the libraries that the installer offered to install for me. It was a HUGE list. Perhaps Paul's library was included in that set?
DeleteChip
Maybe yes I can't check now. But the include doesn't have the same name. You should try the faster library ;-)
Delete